I’m doing my Project 365 based on a week at a time. This means I can have a photo for every day of the week or if there’s an important event, such as the example I’m sharing in my tip today, I can do that whole event on the two-page spread for that week.
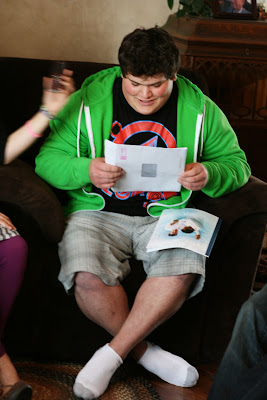
The important event I wanted to capture this last week was my son receiving his LDS mission call. I wanted to include this photo of just him reading the letter informing him of where he was going to serve (which is Washington DC, French speaking), but it was a vertical photo.
 No worries. It can work...vertically even!
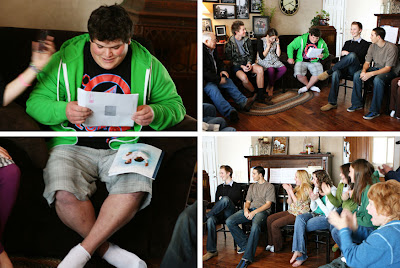
Here’s what I chose to do. I used Photoshop (or you can use Elements or another photo editing software) to crop the photo size to 6" x 8". Then, I cropped and saved a copy of the top half of the photo as a 6" x 4" and did the same for the bottom half . . . giving me two separate photos that can combine to make one, as shown in the layout example here.
 Imagine these photos are contained in the four photo pockets from the kit. Please forgive me for doing this as an example instead of using live product, I’m on “backorder” too. ;) But you get the idea. You’re not limited to strictly 6" x 4" photos. Mix it up, have some fun, and throw in a little variety!


I love this idea and had not even thought about doing it this way, so thanks! I have also been making 2 wallet sized vertical photos into one 4x6 and then cutting them and putting them down in the journaling spots and journaling on a big card and putting it in the picture spot to mix things up a bit and love how it's turning out. Costco is so cheap to print and i just pick up my pics once a week and keep my journaling up to date. Keep the cute ideas coming and congrats to your son Kerri! DC will be a great mission and to learn a language is awesome too!
ReplyDeleteGreat idea :) thanks for sharing!
ReplyDeleteWhat a great idea! Thanks for sharing that. I'm going to have to try that.
ReplyDeleteSneak peak on the February Kit of the month??
ReplyDeleteGreat idea. I'm sometimes using themes for the week of photos - like "winter in my garden" for this week.
ReplyDeleteGreat idea! If you don't have a 6 x 8 photo to cut in half, you could also take a piece of the coordinating background papers and cut it to 6 x 8. Then mount your vertical 4 x 6 in the middle of the background paper and slice the matted photo into two pieces, one for each of the two photo slots. Sorry I don't have a pic...I will try to take one and post it in order to illustrate this concept better.
ReplyDeleteKeep all these great ideas coming!
Thanks for sharing such a great idea! LOVE getting to see everyone's ideas for this wonderful kit.
ReplyDeleteIt's also easy to put two vertical photos on one 4x6 horizontal photo, using either Photoshop/elements (if you happen to have it) or Picasa-- which is absolutely free and very, very easy to use. Then you could either print at home OR send the jpg to be printed at costco or wherever you like.
ReplyDeleteAwesome Idea! I just LOVE that! I'm definitely going to use that idea!
ReplyDeletelove this idea
ReplyDeletePS - congrats on your son's call. I live in DC. It's GREAT!
ReplyDelete